144Hz Monitor Stuck at 60Hz? How to Fix It and Verify Your Real Refresh Rate
You bought a 144Hz monitor, plugged it in, and the desktop feels exactly like your old 60Hz screen. You are not imagining it, and you are not alone: Microsoft’s own Q&A, the NVIDIA forums, Acer’s community, and dozens of Reddit and Tom’s Hardware threads are full of people with the same complaint. The good news is that a high-refresh monitor or laptop stuck at 60Hz is almost never a hardware defect. In the vast majority of cases it is a Windows setting, the wrong cable, a monitor menu toggle, a driver, or a laptop graphics quirk — all of which you can fix yourself in minutes.
This guide does two things most pages skip. First, it walks the full fix flow in the order that actually solves the problem fastest. Second, it shows you how to prove the fix worked, because Windows can claim 144Hz while a cable or driver issue still feeds you fewer real frames. Run the free Monitor Refresh Rate Test after each step and you will see the truth in three seconds.
The fast answer: Windows usually defaults new monitors to 60Hz. Set it manually under Settings › System › Display › Advanced display › Choose a refresh rate › 144Hz. If 144Hz is missing, the cause is almost always the cable (the HDMI 1.4 lead in the box caps 1440p at 60Hz — use DisplayPort or HDMI 2.0+), a monitor Overclock toggle that is off, an outdated GPU driver, or, on a laptop, the integrated GPU driving the panel. After any change, confirm it on the Refresh Rate Test — it should read ~144Hz with low jitter.
Quick Answer: Why Windows Defaults You to 60Hz
When you connect a new display, Windows picks a “safe” mode that it is confident every monitor and cable can handle. That safe mode is almost always 60Hz. It does not read the box your monitor came in, and it does not automatically jump to the panel’s maximum just because the hardware supports it. So even a perfectly working 144Hz monitor on a perfectly good DisplayPort cable will sit at 60Hz until you change the setting by hand.
That is the single most common reason for the problem, and it is a 20-second fix. But there is a catch: if the higher option is missing from the dropdown entirely, Windows is telling you something else in the chain — cable, port, OSD, driver, or laptop graphics mode — cannot deliver 144Hz yet. The steps below are ordered to find that bottleneck quickly. Work top to bottom and re-test after each one.

Step 1: Set the Refresh Rate in Windows 11 / 10
Start here every time, because it resolves the majority of cases on its own. The path is the same on Windows 11 and Windows 10.
- Open Settings (press Windows + I).
- Go to System › Display.
- Scroll down and click Advanced display (on Windows 10 it is Advanced display settings).
- If you have more than one monitor, pick the right one under Choose a display first.
- Under Choose a refresh rate, select 144Hz (or the highest value listed for your panel).
- Click Keep changes within 15 seconds, or Windows reverts to 60Hz automatically.
If 144Hz appears and applies cleanly, you are likely done — jump to proving it below. If the dropdown only shows 60Hz, do not panic and do not assume the monitor is faulty. It means a downstream link cannot carry 144Hz, and the next steps will find it.
One under-documented trap: a mixed-refresh dual-monitor setup. On some older Windows builds and GPU drivers, pairing a 144Hz monitor with a 60Hz second screen can force the fast one down to 60Hz. If you run two displays and one is 60Hz, test the 144Hz monitor alone to rule this out.
Step 2: Your Cable Is Probably the Bottleneck
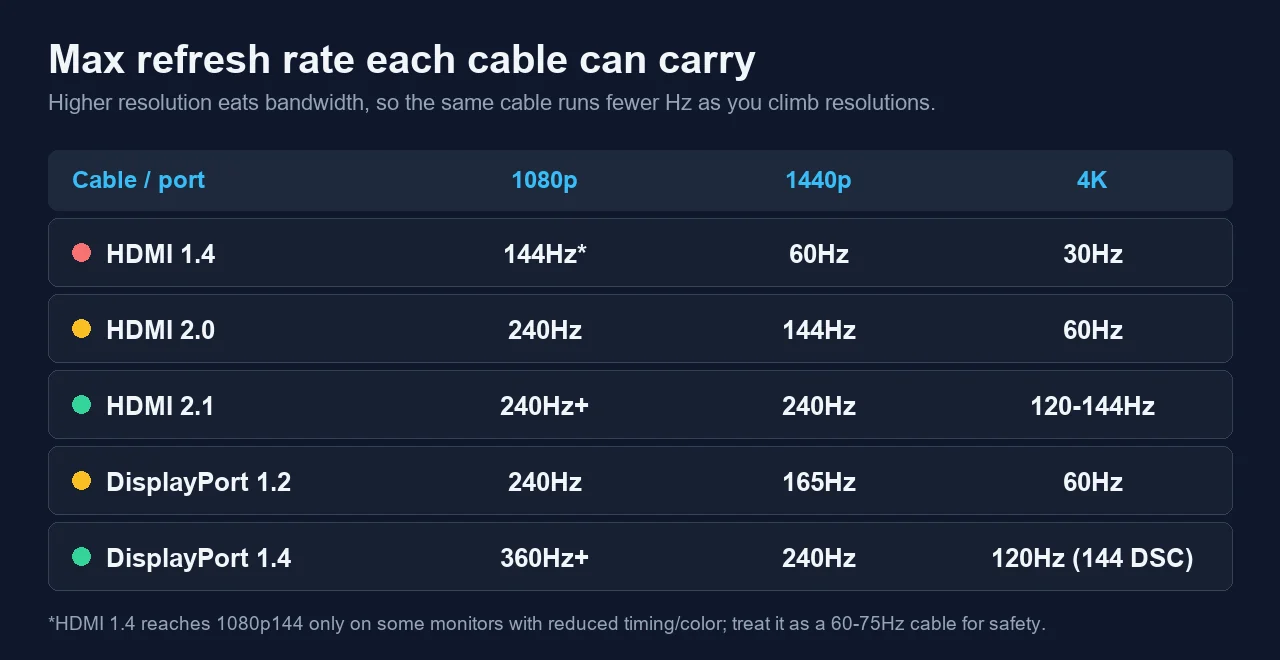
If 144Hz is missing from the Windows dropdown, the cable is the first suspect — especially the generic HDMI 1.4 lead bundled in many monitor boxes. Refresh rate is a bandwidth problem: the higher your resolution, the more data each frame needs, so the same cable runs fewer Hz as resolution climbs. A cable (or port) without enough bandwidth silently falls back to 60Hz, and the higher option never shows up.
| Cable / port | 1080p | 1440p | 4K | Good for 144Hz? |
|---|---|---|---|---|
| HDMI 1.4 (~10.2 Gbps) | 144Hz* | 60Hz | 30Hz | Only 1080p, and only on some monitors. Treat as a 60–75Hz cable. |
| HDMI 2.0 (18 Gbps) | 240Hz | 144Hz | 60Hz | Yes at 1080p and 1440p. |
| HDMI 2.1 (48 Gbps) | 240Hz+ | 240Hz | 120–144Hz | Yes at every common resolution. |
| DisplayPort 1.2 (~17.3 Gbps) | 240Hz | 165Hz | 60Hz | Yes at 1080p and 1440p — the classic 144Hz cable. |
| DisplayPort 1.4 (~25.9 Gbps) | 360Hz+ | 240Hz | 120Hz (144 with DSC) | Yes, with plenty of headroom. |
*HDMI 1.4 hits 1080p144 only on certain monitors using reduced blanking; many cap it at 120Hz. These are the widely cited maximums for standard uncompressed timings, confirmed against Cable Matters and Tom’s Hardware. Real limits vary by monitor firmware, DSC support, and color depth.
What to actually do:
- Use DisplayPort if you have it. DisplayPort 1.2 or newer handles 1080p and 1440p at 144Hz comfortably and is the most reliable choice for high-refresh PC gaming.
- If you must use HDMI, use HDMI 2.0 or newer. Check the monitor spec sheet; the HDMI port version matters as much as the cable.
- Plug into the full-bandwidth port. Some monitors have one fast DisplayPort and a slower HDMI, or pass-through ports on a stand. Use the main input.
- Swap the bundled cable. A known-good, correctly rated cable rules out a damaged or counterfeit lead in one move.
Step 3: Turn On “Overclock” / High-Refresh in the Monitor OSD
Plenty of monitors ship with their highest refresh rate disabled by default in the monitor’s own menu — the on-screen display, or OSD, you reach with the physical buttons or joystick on the panel. Until you flip that switch, Windows will not even offer 144Hz, no matter how good your cable is.
- Find the Overclock / OC / high-refresh option. It is often under a Gaming, Performance, or Setup sub-menu. Many 144Hz and 165Hz panels label their top rate as an “OC” mode that you must enable, then confirm.
- Set the input or picture mode to PC, not Console or AV. On monitors and TVs used as monitors, an AV, Console, or Movie input profile can lock you to 60Hz. Switch the active input to PC mode.
- Pick the right HDMI input version. Some monitors have a per-port setting like HDMI 2.0 / Enhanced versus HDMI 1.4 / Standard. Choose the enhanced option for the port you are using.
- Re-seat the cable and reboot. After enabling overclock, unplug and replug the cable, then restart so Windows re-reads the monitor’s capabilities.
Then go back to Step 1 and check whether 144Hz now appears in the Windows dropdown. If it does, select it and verify on the Refresh Rate Test.
Step 4: Update or Clean-Reinstall the GPU Driver
An outdated, corrupted, or generic Microsoft Basic Display driver can hide your monitor’s real capabilities, so the 144Hz option simply never appears. Updating — or better, cleanly reinstalling — the graphics driver often restores the full list.
NVIDIA
- Download the latest Game Ready driver from NVIDIA’s site or the NVIDIA app.
- During install, choose Custom (Advanced) and tick Perform a clean installation.
- After it finishes, open the NVIDIA Control Panel › Display › Change resolution. Make sure your monitor is selected and the refresh rate dropdown is set to 144Hz. Confirm you are under the PC resolutions category, not Ultra HD, HD, SD, which can hide high-refresh modes.
AMD
- Install the latest Adrenalin driver and select Factory Reset during setup for a clean install.
- Open AMD Software › Settings › Display and confirm the refresh rate, or create a custom resolution at 144Hz if needed.
If a normal install does not help, use the vendor’s clean-install option (or a display driver uninstaller utility) to wipe leftover files, then reinstall and re-pick 144Hz in Windows. This is the same “change one thing, then re-test” discipline that helps when you chase input latency: isolate one variable, confirm with a measurement, move on.
Step 5: Laptops — the MUX Switch / Hybrid-Graphics Trap
Gaming laptops add a twist that desktops do not have. Most use hybrid graphics: a power-saving integrated GPU (Intel or AMD) and a powerful discrete GPU (NVIDIA or AMD). By default, the laptop often routes the internal panel through the integrated GPU to save battery — and that path can be capped at 60Hz, even on a 144Hz or 165Hz screen.
The fix is to make the discrete GPU drive the panel. Look for one of these, depending on your laptop:
- MUX switch / Discrete GPU mode. In the laptop’s vendor app — ASUS Armoury Crate, Lenovo Vantage / Legion Space, HP Omen Gaming Hub, MSI Center, Dell/Alienware Command Center — look for a graphics or display switch and set it to Discrete / dGPU / Ultimate mode. A reboot is required.
- Advanced Optimus. Newer NVIDIA laptops can switch automatically, but the high-refresh path still needs the dGPU active. Confirm in the vendor app.
- BIOS / UEFI graphics mode. Some laptops expose the MUX or “Discrete Graphics” setting only in BIOS. Enter setup at boot (often F2 or Del) and look under Advanced or Display.
- External monitor exception. On many laptops the external video ports are wired directly to the discrete GPU, so an attached 144Hz monitor may already run fast even when the internal panel is stuck at 60Hz. If only the built-in screen is capped, the MUX is almost certainly the cause.
After switching to discrete mode and rebooting, re-check the Windows refresh rate (Step 1) and then confirm on the Refresh Rate Test running on the laptop’s own screen.
Still Stuck? BIOS/UEFI, USB-C Docks, and Firmware
If you have done all five steps and the screen still will not pass 60Hz, you are in the territory most quick guides ignore. Check these less obvious links in the chain.
Edge cases that lock you to 60Hz:
- USB-C / Thunderbolt docks and hubs. Many docks split DisplayPort bandwidth across multiple outputs or only expose an older DisplayPort/HDMI version, which quietly caps refresh rate. Test by plugging the monitor directly into the PC or laptop, bypassing the dock.
- USB-C “DisplayPort Alt Mode” lane allocation. When a USB-C port carries both data and video, it may dedicate fewer lanes to video, lowering the max refresh rate. Use a dedicated DisplayPort or HDMI output if available.
- Monitor firmware. Some monitors received firmware updates that fixed handshake bugs causing a 60Hz lock. Check the manufacturer’s support page for a firmware update tool.
- BIOS/UEFI defaults. Beyond the laptop MUX, a few systems have an iGPU/dGPU primary-display setting or a CSM/secure-boot quirk that affects which adapter drives the screen at boot.
- Cable adapters and converters. HDMI-to-DisplayPort or USB-C-to-HDMI adapters frequently top out at an old standard. Remove the adapter and use a native cable to test.
- G-Sync / FreeSync / VRR handshake. Rarely, a flaky variable-refresh handshake forces a fallback. Toggle G-Sync/FreeSync off, set 144Hz, confirm it holds, then re-enable.
Change one of these at a time and re-measure. Because the test is instant, you can methodically rule out the dock, then the adapter, then firmware, and know exactly which one freed the extra frames.
How to Prove You’re Actually at 144Hz
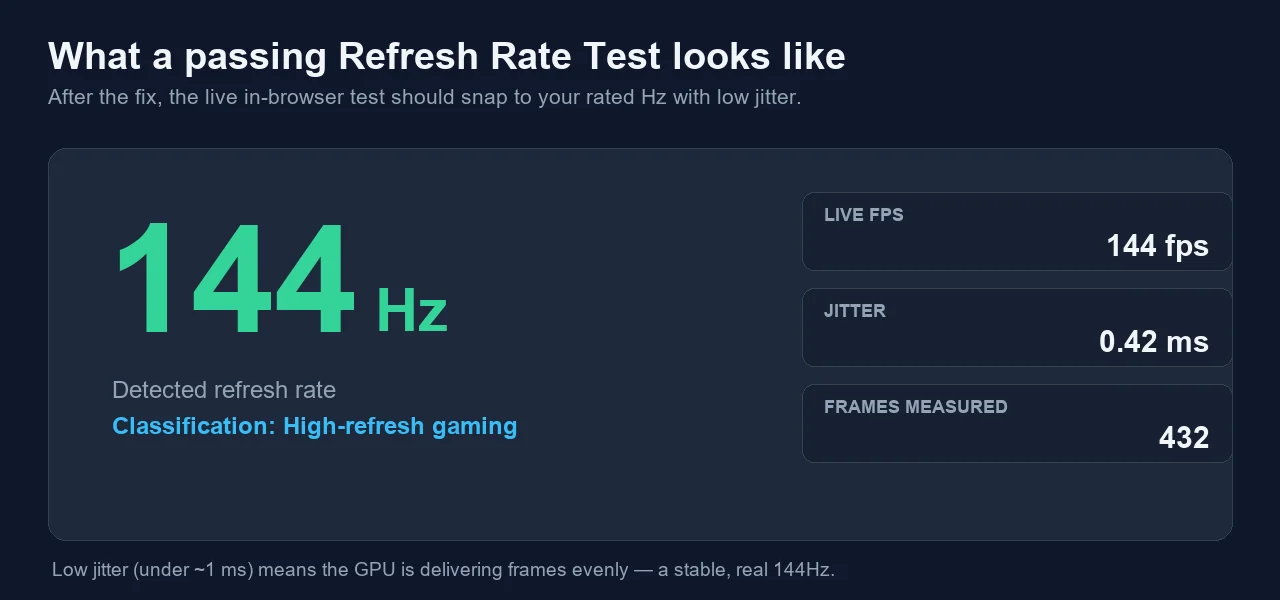
Here is the part competitors leave out: Windows can report 144Hz while you are not getting 144 real frames. A marginal cable, a driver hiccup, or a VRR fallback can leave the setting at 144Hz while the panel scans out fewer frames or stutters. The only way to be sure is to measure what your screen is actually painting.
That is exactly what the Monitor Refresh Rate Test does. It runs entirely in your browser and uses the requestAnimationFrame loop — the browser’s own per-frame callback, which fires in step with the display’s refresh cycle. It samples the time between frames for about three seconds, trims outliers, averages the result, and snaps it to the nearest standard rate. It is a browser-painting measurement, not a hardware probe, so a clean reading is strong real-world proof that your display path is delivering frames at the rate you set.
How to read the result
- Open the test and click Start. Keep the tab in focus and do not move other windows while it samples — background work can drag the number down.
- Read the detected Hz. If you set 144Hz and the test reports ~144Hz, the fix worked. A reading near 60Hz means a step above is still unresolved — go back up the list.
- Check the jitter. Jitter is the variation between frame times. Under ~1 ms means the GPU is delivering frames evenly. High jitter with the right average hints at frame pacing, VSync, or background-load issues.
- Watch live FPS and frame count. Live FPS should hover near your rate, and frames measured should climb steadily. A stalling count suggests the browser tab is throttled (unfocus, power saver, or a battery laptop on the integrated GPU).
Two quick gotchas when verifying:
- Battery laptops may downclock. Plug in and set the Windows power mode to Best performance before testing, or the browser may run on the iGPU at a reduced rate.
- Browser frame-rate caps. Some browsers limit background tabs to 60 fps. Keep the test tab active and in the foreground for an accurate read.
If you prefer to watch the core fix in action, this short walkthrough covers the Windows setting and the most common reasons a monitor only shows 60Hz instead of 144Hz or 240Hz.
Refresh rate is only one piece of a smooth display. Once 144Hz is confirmed, it is worth running a couple of follow-up checks: the Frame Skipping Test catches a monitor that drops frames at a high or overclocked rate, the FPS Test clears up the common refresh-rate-versus-frame-rate confusion, and the Monitor Ghosting Test checks whether the panel’s response time can keep up with all those extra frames.
Sources and Further Reading
- Microsoft Support — Change your screen refresh rate (Windows 11 / 10)
- Microsoft Q&A — “My 144Hz monitor is stuck at 60Hz”
- Cable Matters — DisplayPort 1.4 vs HDMI 2.1 bandwidth and resolution limits
- Tom’s Hardware — DisplayPort vs HDMI: which is better for gaming
- NVIDIA GeForce Forums — “Stuck at 60Hz with 144Hz monitor”
Ready to settle it? Open the Monitor Refresh Rate Test, click Start, and read your real Hz. If it says 144, you won. If it still says 60, walk back up the steps — the number tells you exactly when you have fixed it.
Quick Action Checklist
- Clean the display first so dust is not mistaken for a pixel issue.
- Use full-screen mode where possible.
- Test several solid colors, not only black or white.
- Compare screenshots only after checking the screen directly.
FAQ: 144Hz Monitor Stuck at 60Hz
Why is my 144Hz monitor only showing 60Hz?
It is almost never a broken panel. Windows commonly defaults a new display to 60Hz, so the first fix is Settings › System › Display › Advanced display, then choose 144Hz. If 144Hz is missing from the dropdown, the cause is usually the cable (an HDMI 1.4 lead caps 1440p at 60Hz), the wrong port, a monitor OSD overclock that is switched off, an outdated GPU driver, or, on a laptop, the integrated GPU driving the panel instead of the discrete GPU.
Does HDMI support 144Hz?
It depends on the HDMI version and your resolution. HDMI 1.4 can reach 1080p at 144Hz only on some monitors with reduced timing, and caps 1440p at 60Hz. HDMI 2.0 handles 1080p at 240Hz and 1440p at 144Hz. HDMI 2.1 handles 1440p at 240Hz and 4K at up to 120–144Hz. For trouble-free high refresh, prefer DisplayPort or HDMI 2.0 and newer, and match the cable and the monitor’s port version to your resolution.
How do I check if my monitor is really running at 144Hz?
Open the Monitor Refresh Rate Test and click Start. It uses the browser’s requestAnimationFrame loop to measure how often the page is actually painting, then snaps the result to the nearest standard rate and shows live FPS, jitter, and frames measured. A reading close to 144Hz with low jitter confirms the display is genuinely at 144Hz. Windows can claim 144Hz while a cable or driver issue still serves fewer real frames, so an independent measurement is the proof.
Why does my laptop screen cap at 60Hz even though it’s a 144Hz panel?
Most gaming laptops use hybrid graphics. When the integrated GPU drives the built-in panel through NVIDIA Optimus or AMD switchable graphics, the internal display can be limited to 60Hz. Enabling the MUX switch, Discrete GPU mode, or Ultimate/Advanced Optimus in the BIOS or the vendor app (Armoury Crate, Lenovo Vantage, Omen Gaming Hub, and similar) routes the panel through the discrete GPU and unlocks the full 144Hz or higher. A reboot is usually required.
Can a bad cable cause a 60Hz lock?
Yes. A cable that lacks the bandwidth for your resolution and refresh rate, or a damaged or counterfeit cable, will silently fall back to 60Hz, and 144Hz simply will not appear in the list. The HDMI 1.4 cable bundled with many monitors is a frequent culprit at 1440p. Swap to a known-good DisplayPort or HDMI 2.0+ cable, plug into the monitor’s full-bandwidth port (not a low-spec or pass-through port), then re-check the refresh rate.