Rear Speakers Playing Through the Front? Test Every Channel and Fix Swapped 5.1/7.1 Audio
You paid for a 5.1 or 7.1 setup, but the rear channels are coming out of the front speakers. Maybe the surrounds are completely silent, maybe they echo whatever the fronts are doing, or maybe every speaker plays the same thing at once. It is one of the most common home-theater complaints on Tom’s Guide, AVS Forum, and Microsoft’s own Q&A — and the worst thing you can do is start re-running cables blind. Half the time the wiring is fine and the real culprit is a Windows setting, a receiver mode, or content that was never 5.1 to begin with.
This guide does the thing every quick fix-it page skips: it makes you prove which channel is actually wrong first. Run the free Surround Sound Test, walk a tone around every named channel, and you will know within a minute whether you have a silent channel, a swapped channel, or a duplicated one. That single observation tells you which fix to try — so you only re-cable when the test says the cables are the problem.
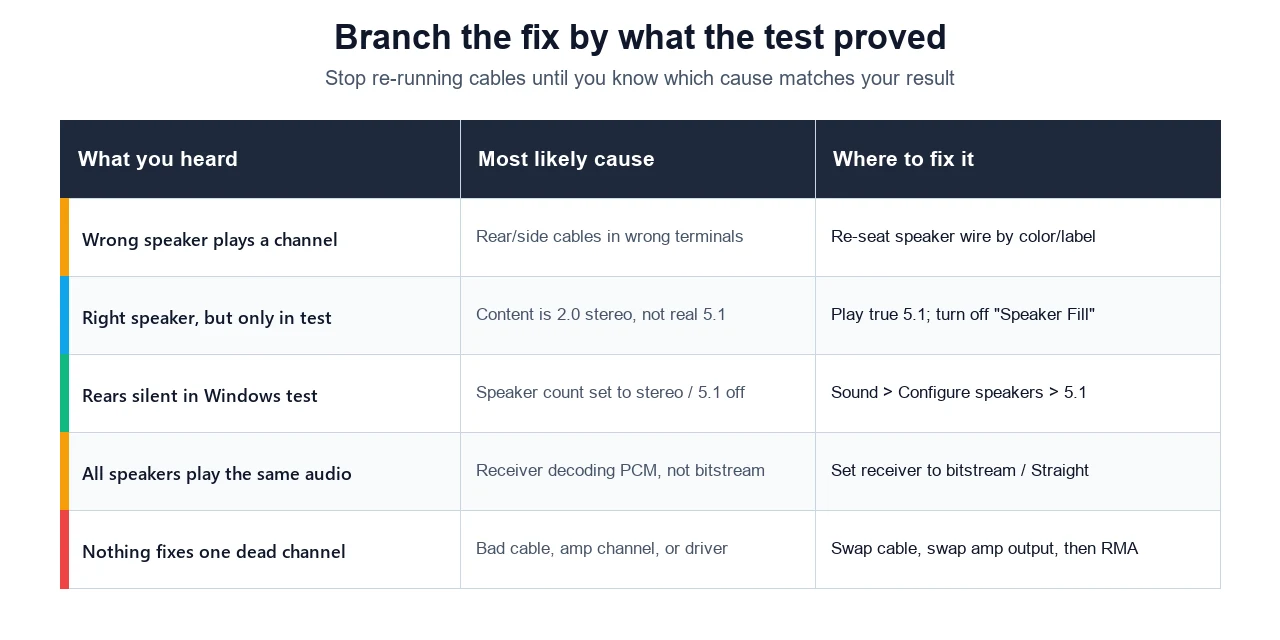
The fast answer: Rear-through-front audio is almost always one of four causes. Open the Surround Sound Test and click each channel in turn. If a front speaker plays when you click a rear channel, your rear cables are in the wrong terminals — re-seat them. If every speaker plays at once, turn off Realtek Speaker Fill and set your receiver to a direct/straight mode. If a channel is silent, set 5.1/7.1 in Windows › Configure speakers. And if it only sounds wrong on some videos, the content is 2.0 stereo, not real 5.1 — nothing is broken.
What “Rear Playing Through Front” Actually Means
Surround sound is a mapping problem before it is a hardware problem. Each speaker has a named channel — front left, front right, center, the subwoofer (LFE), the rears, and on 7.1 the two sides — and something in the chain decides which channel feeds which physical box. When people say the rears are “playing through the front,” they almost always mean one of three different faults, and the fixes are not the same.
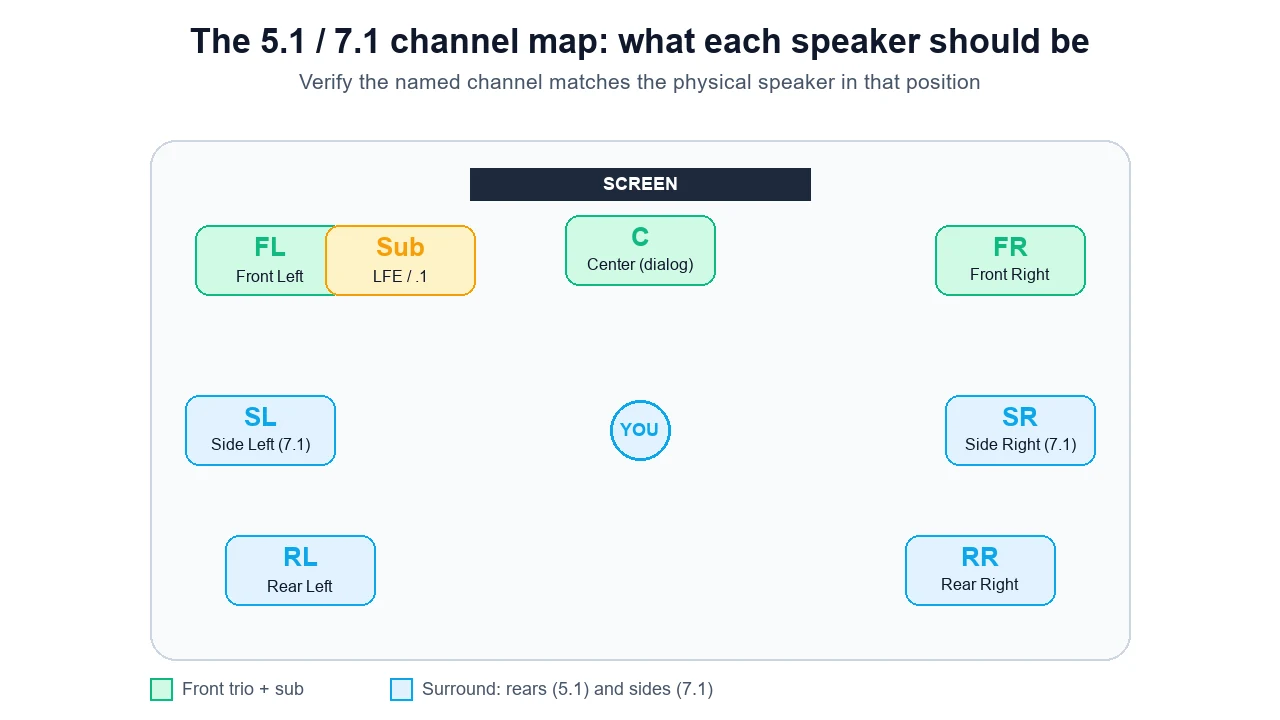
The center carries most movie dialog, the .1 is the low-frequency effects channel that feeds the subwoofer, and the rears and sides handle ambience and panning. In a correctly mapped room you should be able to call out a channel and have exactly one speaker answer. If the wrong speaker answers, the map is broken somewhere — at the cable, in the operating system, or in the receiver. The next steps find out where.
Step 1: Walk a Tone Around Every Channel
Do not touch a single cable yet. First, isolate each channel and listen. The Surround Sound Test uses the Web Audio API’s channel merger to send a short tone to one output channel at a time — front left, front right, center, sub, rear left, rear right, and the side pair on 7.1. You click a channel, and you listen for which physical speaker actually responds.
- Open the test and start with the fronts. Click Front Left, then Front Right. Confirm the correct front speaker plays each one. This proves your baseline stereo path is right before you judge the rears.
- Check the center and sub. The center should come from the speaker above or below the screen; the sub should produce a low rumble you feel more than hear.
- Walk to the rears. Click Rear Left and Rear Right and note exactly which speaker plays. This is the moment of truth: if a front speaker answers a rear channel, you have found your fault.
- On 7.1, check the sides. Side left and side right sit beside the listening position; rears sit behind it. Mixing these two up is a classic 7.1 wiring error.
A note on honesty: most browsers downmix everything to stereo before it reaches your audio device, even when the device supports eight channels. When that happens, the test falls back to stereo panning so you can still verify the order of the walk. For a true discrete-channel test, also use the Windows or receiver test tone described below — the browser walk is the fast first pass, not the final word on routing.
Step 2: Read the Result — Silent, Swapped, or Duplicated
Everything you do next depends on which of three patterns you just heard. Match your symptom to one of these and you will know which fix to open first.
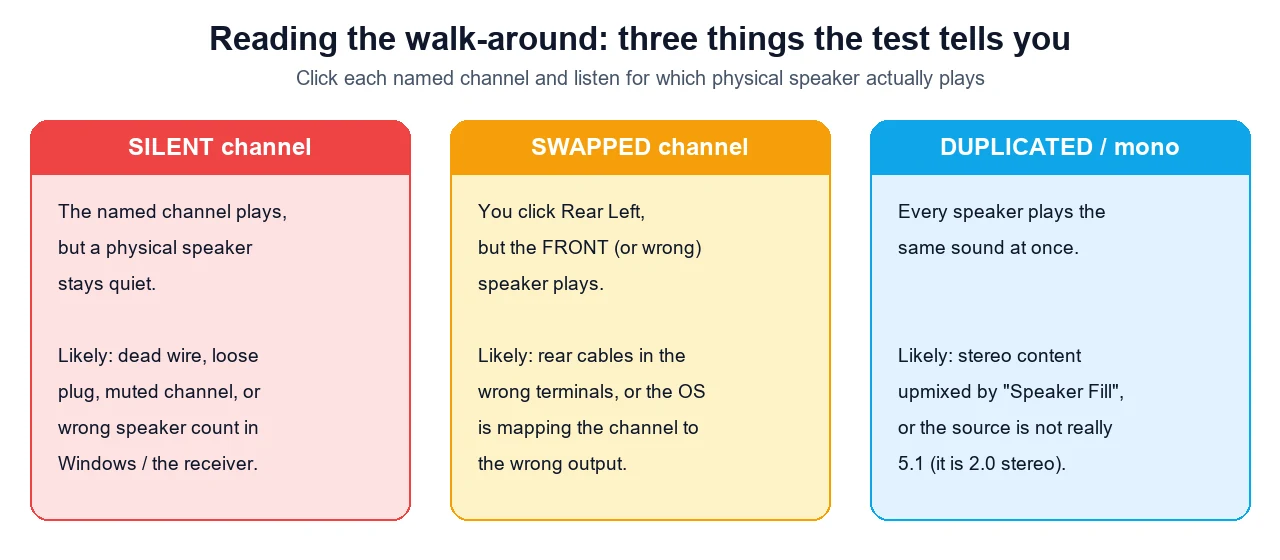
- Silent channel. You click a rear channel and nothing plays. The wire, the plug, the channel mute, or the speaker count is wrong — jump to the Windows fix and cable check.
- Swapped channel. You click Rear Left and a front (or the wrong) speaker plays. This is a routing or wiring mistake — start with swapped cables.
- Duplicated / mono. Every speaker plays the same tone at once. Something is upmixing stereo to all channels, or the source is not real 5.1 — go to receiver decode and the content check.
Fix A: Swapped or Mismapped Speaker Cables (Most Common)
If a rear channel plays out of a front speaker, the most likely explanation is that the rear speaker wires are plugged into the wrong terminals on the amplifier, receiver, or active speaker hub. On analog 5.1 sound cards this is rampant because the jacks are color-coded and easy to mix up: green is front, black is rear, orange is center/sub, and grey is side. Get green and black backwards and your fronts and rears swap.
- Match by color and label. Trace each speaker wire back to its terminal and confirm it lands on the correctly labelled output (Front L/R, Surround/Rear L/R, Center, Sub, Side L/R). Re-seat anything that does not match.
- Check left/right within a pair. It is easy to swap the two rears with each other. After fixing the obvious front/rear swap, re-run the walk to confirm Rear Left really is on the left.
- Watch speaker-level polarity. For passive speakers wired with bare wire, keep positive (+) to positive and negative (−) to negative. Reversed polarity will not swap a channel, but it thins out the bass and muddies imaging.
- Re-test after every change. Because the walk-around is instant, fix one cable, re-run the test, and you will know immediately whether that was the one.
This is the same “change one thing, then re-measure” discipline that pays off when you verify left and right channels on a stereo setup: isolate one variable, confirm with the test, move on.
Fix B: Windows and Realtek Configuration
If the cables are right but a channel is silent or duplicated, the operating system is the next suspect. Windows often defaults a new device to plain stereo, and Realtek’s “Speaker Fill” feature actively copies two-channel audio to every speaker, which is exactly what makes a setup sound like the rears are echoing the fronts.
Set the speaker count in Windows
- Right-click the speaker icon in the taskbar and open Sound settings, then scroll to More sound settings (the classic Sound control panel).
- On the Playback tab, select your speakers or receiver, then click Configure.
- Choose 5.1 Surround or 7.1 Surround, click each speaker in the diagram to fire its test tone, and finish the wizard.
- Back in Playback, open Properties › Advanced and pick a default format such as 24-bit, 48000 Hz so the device exposes full multichannel output.
Turn off Speaker Fill in Realtek Audio Console
On many motherboards the discrete-channel behavior lives in the Realtek Audio Console (or your sound card’s own app), not just in Windows. As the fix in Microsoft’s Windows 11 surround Q&A shows, you usually need to set the speaker configuration to 5.1/7.1 there as well, enable the surround speakers, and disable Speaker Fill so stereo audio stops being copied to every channel. If your surrounds went quiet right after a Windows 10 to 11 upgrade, also reinstall the motherboard chipset and audio drivers, then reconfigure from scratch.
Fix C: AV Receiver or Soundbar Decode
When sound reaches an external AV receiver or soundbar over HDMI or optical, the receiver decides how to spread the signal. Two settings cause the rear-through-front feeling more than any others.
Receiver settings to check:
- Listening mode. Modes like Multi-Channel Stereo or All-Channel Stereo deliberately play the same audio everywhere. Switch to Direct, Pure, or Straight so the receiver plays the real channel layout instead of spreading it.
- PCM vs bitstream. If the source sends two-channel PCM, the receiver has no separate rear data to work with and either mutes the rears or fakes them. Set the player, console, or PC to output bitstream (Dolby/DTS) so the receiver receives and decodes a true multichannel stream. This single setting fixes a large share of “rears only play in the test tone but not during movies” cases.
- Speaker configuration and trims. Confirm the receiver itself is set to the right number of speakers, that no surround channel is set to “None,” and that the channel level trims for the rears are not turned down to nothing.
- Re-run the receiver test tone. Almost every receiver has a built-in setup test tone that cycles each channel. That is the most reliable hardware-level confirmation that wiring at the receiver is correct, independent of anything the PC or browser does.
Fix D: It Is Not Actually 5.1 (the Reality Check)
Here is the cause nobody wants to hear: a lot of the time, nothing is broken. A stereo (2.0) track has no separate rear information at all, so the rears can only stay silent or echo the fronts, no matter how perfectly everything is wired. As community threads on AVS Forum and Tom’s Guide repeatedly point out, most online video — including a large share of YouTube — is plain stereo even when a title claims “surround.”
- Test with genuine 5.1 content. Use a Blu-ray with a Dolby Digital or DTS track, a dedicated 5.1 test file, or a game with native surround. If discrete channels work there, your hardware is fine.
- Do not judge surround by YouTube. Streaming surround is inconsistent and often downmixed before it reaches your device, so it is the worst possible reference for diagnosing wiring.
- Decide whether you even want upmixing. If you like a fuller sound from stereo sources, leave a Dolby Surround or DTS Neural:X upmixer on. Just know that is a deliberate effect, not a sign your channels are mapped correctly.
Once channels play from the right speakers, it is worth a couple of follow-up checks. The Headphone and Speaker Test confirms basic left/right output and routing, the Left/Right Speaker Test double-checks stereo direction, and the Decibel Meter helps you level-match the channels so the rears are not simply too quiet to notice.
When to Re-Cable vs RMA
The walk-around does not just diagnose — it also tells you when to stop. Use this rule so you do not waste a weekend or pay for a repair you do not need.
- Re-cable when a channel comes out of the wrong physical speaker. That is a wiring or terminal mistake you can fix yourself, and the test will confirm it the moment you get it right.
- Move to a different output when one channel stays dead. Swap that speaker’s cable to a known-good output (for example, plug the rear into the front terminal). If it plays there, the speaker is fine and the original amplifier channel is the problem.
- RMA or repair only when a speaker stays silent even on a known-good output with a known-good cable. At that point you have isolated the fault to the speaker itself.
- Check warranty before opening anything. Many active surround systems and soundbars void warranty if you crack the case, so confirm coverage first.
If you prefer to watch the core Windows fix in action, this walkthrough covers configuring 5.1 surround and the settings that route channels to the wrong speakers.

Sources and Further Reading
- Microsoft Q&A — No sound from surround speakers in Windows 11 (Realtek Speaker Fill, chipset driver)
- Microsoft Support — Fix sound and audio problems in Windows
- Dolby — 5.1 speaker setup and placement guide
- AVS Forum — “Rear surround output plays through front speakers”
- Tom’s Guide — “Rear Channels Play Through Front Speakers”
Ready to settle it? Open the Surround Sound Test, walk a tone around each channel, and let the result tell you exactly which fix you need. If the wrong speaker answers, you found your problem — and you will know the instant you have fixed it.
Quick Action Checklist
- Select the correct input or output device first.
- Test in a quiet room and then in your real call or gaming setup.
- Check browser permission prompts before blaming hardware.
- Retest after changing USB ports, Bluetooth mode, or audio drivers.
FAQ: Rear Speakers Playing Through the Front
Why are my rear surround speakers playing through the front speakers?
It is almost always one of four things: the rear speaker cables are in the wrong terminals, Windows or your sound card is set to stereo or has Speaker Fill copying audio to every speaker, the AV receiver is decoding plain two-channel PCM instead of a real surround stream, or the content itself is only 2.0 stereo and not true 5.1. Run a per-channel walk-around test first so you know whether a channel is silent, swapped, or duplicated, then fix the matching cause.
How do I test which surround speaker is which?
Use a tool that sends a tone to one named channel at a time. Open the Surround Sound Test, play front left, front right, center, sub, rear left, rear right, and the 7.1 side channels in turn, and confirm the physical speaker in that position is the one that responds. If you click Rear Left and a front speaker plays, that channel is swapped. If nothing plays, that channel is silent. The Windows Configure speakers panel and most AV receivers also have a built-in test tone for a final hardware-level check.
Why does every speaker play the same sound at once?
Identical audio from every speaker usually means the signal is being upmixed rather than truly separated. On Windows, Realtek Speaker Fill copies stereo audio to all speakers, which sounds enveloping but defeats discrete channel testing, so turn it off. On an AV receiver, a multichannel-stereo or all-channel-stereo listening mode does the same thing. Switch to a direct or straight mode and play genuine 5.1 content to hear real channel separation.
Are my speakers broken if surround only sounds wrong on some videos?
Probably not. A huge share of online video, including most YouTube clips, is 2.0 stereo even when it claims to be surround. A stereo track has no separate rear information, so the rears either stay quiet or echo the fronts no matter how perfect your wiring is. Confirm with a known 5.1 source such as a Blu-ray, a 5.1 test file, or a game with native surround. If discrete channels work there, your hardware is fine and the earlier clip simply was not 5.1.
When should I re-run cables or RMA a surround speaker?
Re-run cables when the walk-around test shows a channel coming out of the wrong physical speaker, since that points to a wiring or terminal mistake you can fix yourself. Consider a repair or RMA only after one channel stays dead through every test even when you swap its cable to a known-good output and move it to a different amplifier channel. If the channel works on another output but not its own, the amplifier channel or receiver is the suspect, not the speaker.